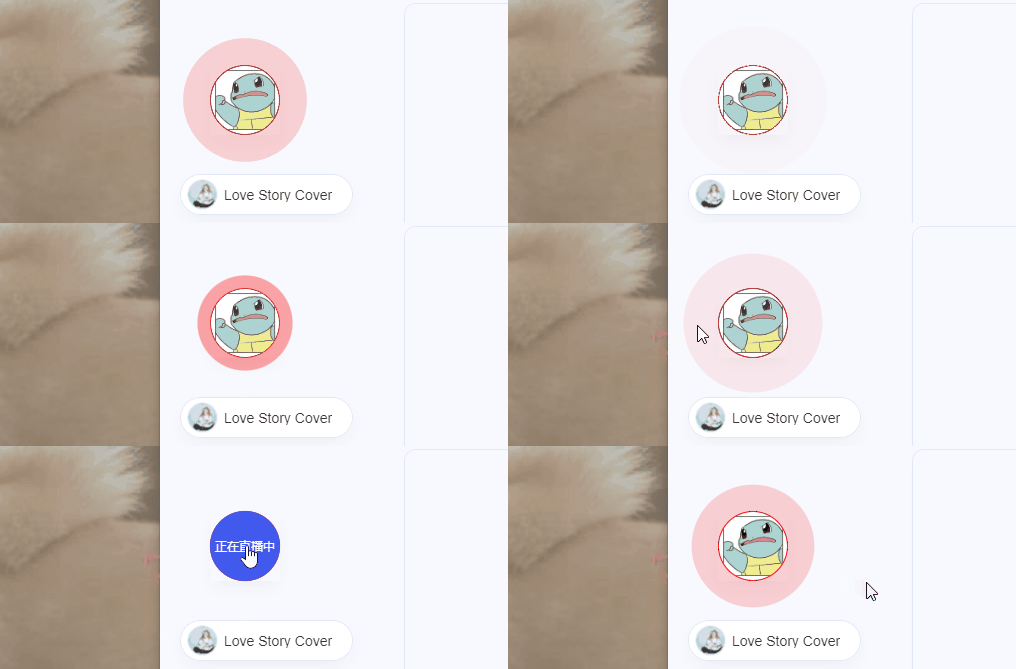
Acrylic主题魔改之监听b站是否开播动画
博主所使用Hexo版本:6.3.0,Acrylic主题版本:1.1.2,版本不同可能会有不同,注意你的版本

1、思路步骤
先针对【如何监听直播间是否开播】回答:在网络以及群友的帮助下,找到了监听直播间是否开播的b站api,我们只需要一直循环请求该api就可以了
请求地址:https://api.live.bilibili.com/room/v1/Room/get_info?roo_id=xxx
room_id就是直播间id
请求方式:GET
响应示例:
1
2
3
4
5
6
7
8
9
10
11
12
13
14
15
16
17
18
19
20
21
22
23
24
25
26
27
28
29
30
31
32
33
| {
"code": 0,
"msg": "ok",
"message": "ok",
"data": {
"uid": 3493285851040490,
"room_id": 30298443,
"short_id": 0,
"attention": 0,
"online": 2,
"is_portrait": false,
"description": "",
"live_status": 0,
"area_id": 377,
"parent_area_id": 11,
"parent_area_name": "知识",
"old_area_id": 6,
"background": "",
"title": "萌新驾到,多多指教!",
"user_cover": "https://i0.hdslb.com/bfs/live/1f25d8747696d488e93cf6feaa986eff614f49c5.png",
"keyframe": "",
"is_strict_room": false,
"live_time": "0000-00-00 00:00:00",
"tags": "",
"is_anchor": 0,
"room_silent_type": "",
"room_silent_level": 0,
"room_silent_second": 0,
"area_name": "职场·技能",
"pendants": "",
"area_pendants": "",
}
}
|
其中live_status字段即表示开播状态,0表示未开播 1表示开播
这个问题解决之后,出现了新的问题。就是这个接口是跨域的,需要nginx配置代理。
nginx配置:
1
2
3
4
5
6
7
8
9
10
| #跨域-start
location /api/live/room {
#proxy_pass https:
proxy_pass https:
proxy_set_header Host api.live.bilibili.com;
# 重写请求路径,将 "/api/live/room" 替换为实际的 API 路径和参数
#rewrite ^/api/live/room(.*)$ /room/v1/Room/get_info$1$is_args$args break;
}
#跨域-end
|
我们发现重写请求路径时,nginx自动把问号给url编码了,把?变成了%3。所以我只有将代理地址写全,这样的缺点就是全部写死了,但是实现了效果(应该是有解决方案的,能把重写的地址不进行url编码)
如果这样配置,那么js中的请求地址:/api/live/room?room_id=30298443
完整代码:
1
2
3
4
5
6
7
8
9
10
11
12
13
14
15
16
17
18
19
20
21
22
23
24
25
26
27
28
29
30
31
|
var element = document.getElementById('isHide');
element.addEventListener('click',function() {
window.open('https://live.bilibili.com/30298443');
})
let isZhibo = function() {
var xhr = new XMLHttpRequest();
xhr.open('GET', '/api/live/room?room_id=30298443', true);
xhr.onreadystatechange = function() {
if (xhr.readyState === 4 && xhr.status === 200) {
var response = JSON.parse(xhr.responseText);
console.log(response);
if(response.data.live_status === 1){
element.style.display = 'flex';
}else{
element.style.display = 'none';
}
}else {
element.style.display = 'none';
}
};
xhr.send();
}
window.onload = function (){
isZhibo();
setInterval(isZhibo, 60000);
}
|
【如何实现这个动画】:其实就是一个盒子阴影的动画,由小变大,并且逐渐透明
1
2
3
4
5
6
7
8
| @keyframes ripple {
0% {
box-shadow: 0 0 0 0 rgba(255, 0, 0, 0.5);
}
100% {
box-shadow: 0 0 0 40px rgba(255, 0, 0, 0);
}
|
2、开始修改
1、在主题目录下layout/partial/compoment/thrid-party 新建blogger.ejs文件,文件内容如下:
1
2
3
4
5
6
7
8
9
10
11
12
13
14
15
16
17
18
19
20
21
22
23
24
25
26
27
28
29
30
31
32
33
34
35
36
37
38
39
40
41
42
43
44
45
46
47
48
49
50
51
52
53
54
55
56
57
58
59
60
61
62
63
64
65
66
67
68
69
70
71
72
73
74
75
76
77
78
79
80
81
82
83
84
85
86
87
88
89
90
91
92
93
94
95
96
| <div class="zhibo_all_box needEndHide" title="点击跳转直播间" id="isHide">
<div class="zhibo_font">正在直播中</div>
<div class="zhibo_img"></div>
</div>
<script>
// 获取元素
var element = document.getElementById('isHide');
// 绑定点击事件
element.addEventListener('click',function() {
    window.open('https://live.bilibili.com/30298443');
})
let isZhibo = function() {
        var xhr = new XMLHttpRequest();
        xhr.open('GET', '/api/live/room?room_id=30298443', true);
        xhr.onreadystatechange = function() {
            if (xhr.readyState === 4 && xhr.status === 200) {
                var response = JSON.parse(xhr.responseText);
                console.log(response);
                if(response.data.live_status === 1){
                    element.style.display = 'flex';
                }else{
                    element.style.display = 'none';
                }
            }else {
                // var response = JSON.parse(xhr.responseText);
                // console.log(response);
                element.style.display = 'none';
            }
        };
        xhr.send();
    }
    window.onload = function (){
        isZhibo();
        // // 设置每隔一分钟执行一次 sendRequest 函数
        setInterval(isZhibo, 60000);
    }
</script>
<style>
@media screen and (max-width: 1300px) {
.zhibo_all_box {
display: none !important;
}
}
.zhibo_all_box {
display: none;
align-items: center;
z-index: 1001;
position: fixed;
bottom: 100px;
left: 50px;
cursor: pointer;
transition: 0.3s;
transform-origin: left bottom;
box-shadow: var(--heo-shadow-border);
background-color: transparent;
}
.zhibo_all_box .zhibo_font {
color: var(--heo-white);
background: var(--heo-main);
width: 100%;
height: 100%;
position: absolute;
top: 0;
left: 0;
align-items: center;
justify-content: center;
display: flex;
border-radius: 50%;
opacity: 0;
font-size: 12px;
transition: 0s;
z-index: 2;
pointer-events: none;
transition: 0.3s;
}
.zhibo_all_box:hover .zhibo_font {
opacity: 1;
}
.zhibo_all_box .zhibo_img {
width: 70px;
height: 70px;
background: url("http://image.wazicode.top/blog/202307060036148.png") no-repeat center / cover;
border-radius: 50%;
box-shadow: 0 0 0 0 rgb(255, 0, 0);
animation: ripple 2s infinite;
border: 1px solid red;
}
@keyframes ripple {
        0% {
            box-shadow: 0 0 0 0 rgba(255, 0, 0, 0.5);
        }
        100% {
            box-shadow: 0 0 0 40px rgba(255, 0, 0, 0);
        }
}
</style>
|
2、引入这个ejs文件
找到主题文件夹下 layout/layout.ejs 在结尾body标签前加入该代码
1
| <%- partial('partial/compoment/third-party/blogger', {cache: true}) %>
|
原来是这样(部分代码):
1
2
3
4
| <%- partial('partial/body', {cache: true}) %>
<%- partial('partial/compoment/third-party/search/index', {cache: true}) %>
<%- partial('partial/compoment/third-party/music', {cache: true}) %>
</body>
|
加上之后:
1
2
3
4
5
| <%- partial('partial/body', {cache: true}) %>
<%- partial('partial/compoment/third-party/search/index', {cache: true}) %>
<%- partial('partial/compoment/third-party/music', {cache: true}) %>
<%- partial('partial/compoment/third-party/blogger', {cache: true}) %>
</body>
|


